
Arduino กับการกดคีย์บอร์ดบนคอมพิวเตอร์
เนื่องจากบอร์ด Arduino ที่รองรับการทำเป็นคีย์บอร์ดตรงๆเลย รองรับเฉพาะบอร์ด Arduino Leonardo เท่านั้น บอร์ดอื่นๆไม่สามารถทำเป็นคีย์ได้ ทาง IOXhop จึงใช้วิธีการให้บอร์ด Arduino ส่งปุ่มที่ต้องการกดผ่าน Serial มายังคอมพิวเตอร์ที่มีโปรแกรมรอรับข้อมูลอยู่ เมื่อโปรแกรมได้รับแล้วจะกดปุ่มตามที่ได้ส่งมาจากบอร์ด
โปรแกรมที่ใช้รับข้อมูลจาก Arduino ทางเว็บ IOXhop ได้เขียนไว้ให้ใช้งานแล้ว โปรแกรมชื่อว่า Serial2Keyboard สามารถดาว์โหลดได้ที่ : https://github.com/maxpromer/Serial2Keyboard/raw/master/Serial2Keyboard.exe
ฝั่ง Arduino
ที่ฝั่ง Arduino ใช้แค่คำสั่ง Serial.print() ส่งข้อความที่ต้องการให้พิมพ์ หรือปุ่มที่ต้องการให้กดลงไปได้เลย
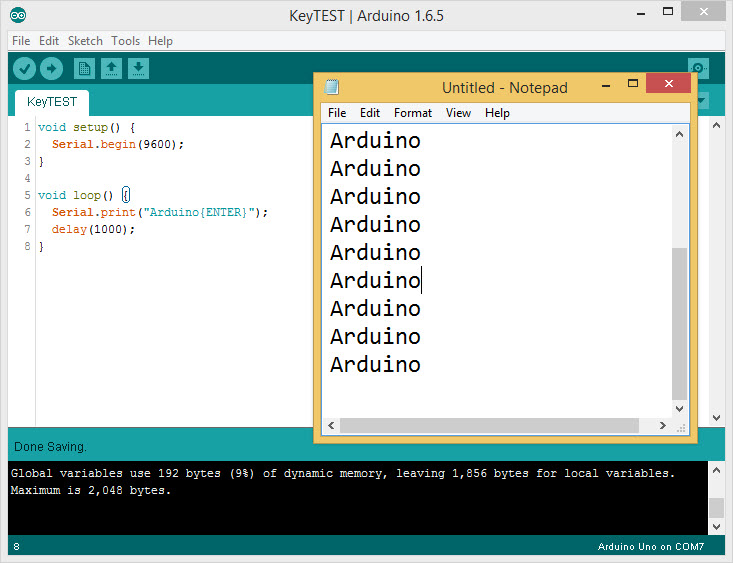
ตัวอย่าง
void setup() {
Serial.begin(9600);
}

void loop() {
Serial.print("Arduino{ENTER}");
delay(1000);
}
การส่งค่าข้อความ สามารถใส่ข้อความลงไปได้เลย แต่หากต้องการให้ส่งการกดปุ่มบนคีย์บอร์ด ต้องนำเครื่องหมายปีกกามาใช้ร่วมกับชื่อของปุ่มนั้นๆ เช่น ปุ่ม Enter ใช้ {ENTER} ปุ่ม A ใช้ {A} นอกจากนี้ยังมีปุ่มอื่นๆ สามารถอ่านได้จากด้านล่างนี้
| Command | Resulting Keypress |
|---|---|
| {!} | ! |
| {#} | # |
| {+} | + |
| {^} | ^ |
| {{} | { |
| {}} | } |
| {SPACE} | SPACE |
| {ENTER} | ENTER key on the main keyboard |
| {ALT} | ALT |
| {BACKSPACE} or {BS} | BACKSPACE |
| {DELETE} or {DEL} | DELETE |
| {UP} | Up arrow |
| {DOWN} | Down arrow |
| {LEFT} | Left arrow |
| {RIGHT} | Right arrow |
| {HOME} | HOME |
| {END} | END |
| {ESCAPE} or {ESC} | ESCAPE |
| {INSERT} or {INS} | INS |
| {PGUP} | PageUp |
| {PGDN} | PageDown |
| {F1} - {F12} | Function keys |
| {TAB} | TAB |
| {PRINTSCREEN} | Print Screen key |
| {LWIN} | Left Windows key |
| {RWIN} | Right Windows key |
| {NUMLOCK on} | NUMLOCK (on/off/toggle) |
| {CAPSLOCK off} | CAPSLOCK (on/off/toggle) |
| {SCROLLLOCK toggle} | SCROLLLOCK (on/off/toggle) |
| {BREAK} | for Ctrl+Break processing |
| {PAUSE} | PAUSE |
| {NUMPAD0} - {NUMPAD9} | Numpad digits |
| {NUMPADMULT} | Numpad Multiply |
| {NUMPADADD} | Numpad Add |
| {NUMPADSUB} | Numpad Subtract |
| {NUMPADDIV} | Numpad Divide |
| {NUMPADDOT} | Numpad period |
| {NUMPADENTER} | Enter key on the numpad |
| {APPSKEY} | Windows App key |
| {LALT} | Left ALT key |
| {RALT} | Right ALT key |
| {LCTRL} | Left CTRL key |
| {RCTRL} | Right CTRL key |
| {LSHIFT} | Left Shift key |
| {RSHIFT} | Right Shift key |
| {SLEEP} | Computer SLEEP key |
| {ALTDOWN} | Holds the ALT key down until {ALTUP} is sent |
| {SHIFTDOWN} | Holds the SHIFT key down until {SHIFTUP} is sent |
| {CTRLDOWN} | Holds the CTRL key down until {CTRLUP} is sent |
| {LWINDOWN} | Holds the left Windows key down until {LWINUP} is sent |
| {RWINDOWN} | Holds the right Windows key down until {RWINUP} is sent |
| {ASC nnnn} | Send the ALT+nnnn key combination |
| {BROWSER_BACK} | Select the browser "back" button |
| {BROWSER_FORWARD} | Select the browser "forward" button |
| {BROWSER_REFRESH} | Select the browser "refresh" button |
| {BROWSER_STOP} | Select the browser "stop" button |
| {BROWSER_SEARCH} | Select the browser "search" button |
| {BROWSER_FAVORITES} | Select the browser "favorites" button |
| {BROWSER_HOME} | Launch the browser and go to the home page |
| {VOLUME_MUTE} | Mute the volume |
| {VOLUME_DOWN} | Reduce the volume |
| {VOLUME_UP} | Increase the volume |
| {MEDIA_NEXT} | Select next track in media player |
| {MEDIA_PREV} | Select previous track in media player |
| {MEDIA_STOP} | Stop media player |
| {MEDIA_PLAY_PAUSE} | Play/pause media player |
| {LAUNCH_MAIL} | Launch the email application |
| {LAUNCH_MEDIA} | Launch media player |
| {LAUNCH_APP1} | Launch user app1 |
| {LAUNCH_APP2} | Launch user app2 |
| {OEM_102} | Either the angle bracket key or the backslash key on the RT 102-key keyboard |
ฝั่งคอมพิวเตอร์
เมื่อดาว์โหลดโปรแกรมเรียบร้อยแล้ว คลายไฟล์ เปิดไฟล์โปรแกรม Serial2Keyboard.exe ขึ้นมา ก็จะพบหน้าต่างสำหรับการตั้งค่าเชื่อมต่อขึ้นมา ขั้นตอนการตั้งค่าเป็นดังนี้
1. เลือกพอร์ตของบอร์ด Arduino ให้ถูกต้อง
2. เลือก Baud Rate ที่ได้ตั้งไว้ในโค้ดโปรแกรม Arduino

เมื่อตั้งค่าเรียบร้อยแล้ว กดปุ่ม Start ! โปรแกรมจะเริ่มรับค่าจาก Arduino แล้วกดปุ่มคีย์บอร์ดทันที
หากต้องการออกจากโปรแกรม ให้กดปุ่ม Shift + alt + d โปรแกรมก็จะถูกปิดไปครับ
-----------------------------------------------------

 ArtronShop บอร์ดอิเล็กทรอนิกส์ Arduino ESP32 ESP8266


TOP เลื่อนขึ้นบนสุด
